Tuesday, May 31, 2011

Instax Mini 25 Photobook Tutorial

Happy Tuesday everyone! I hope that you had a lovely holiday weekend and were able to find some time to consider our service men and women. I was able to find a little time to work on a fun project to house all of my photos that I've taken using my new Instax Mini 25 - see related post... I definitely followed the directions pretty closely from this site to create the photobook, but I also switched it up just a bit to make it more "mine." So, I thought I would share my process and the finished product with my readers... Here we go...

Step 1: Gather Materials

Here is a list of the products I used and a link if the item was something that I recently purchased:
Step 2: Trim the Paper & Cardboard

Once I decided on the paper that I was going to use for the project, I chose to trim it out at 4.5 inches x 3.25 inches, to ensure that the badge holders were completely covered by the cover.

Step 3: Adhere the paper to the cardboard
Simply, adhere the paper to the front and backsides of the cardboard. I ended up running a line of adhesive dots along the short sides of the paper.
Here is a look at what the front and back of the cover after the paper was adhered...

Step 4: Sew the front and back cover
I decided to go ahead and sew a line at the top and the bottom of both the front and back cover. Not only does this add a little aesthetic appeal, but it also ensures that the paper that we added will continue to stay on the cardboard.
Step 5: DECORATE!
Of course, as a scrapbooker, one of my favorite parts of the project is to decorate the project! I had these really great Hambly Screen print rub ons that I used for the project and they corresponded great with the Studio Calico paper... here's a look at the back inside cover just before I rubbed on the screen print...
And after...
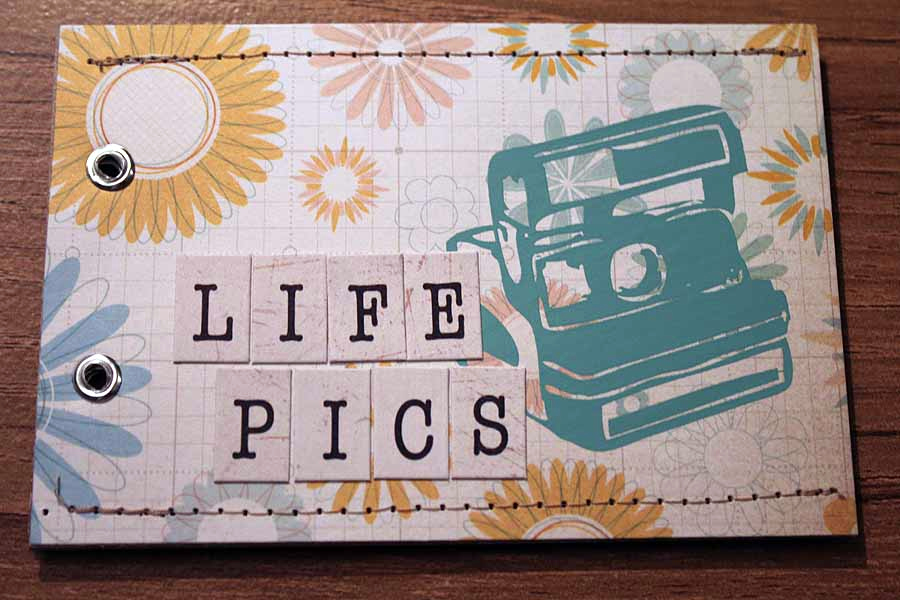
Here's a look at the front cover - don't you just love that old school polaroid rub-on?!? It worked great to use on the cover of this project, since the photos that will be in the book are instant too!
Here's a look at the inside of both the front and back covers...
Step 6: Punch holes and add eyelets
I used the badge holders as a template and marked on the cover where the hole needed to be punched. Because my cardboard was relatively thin, I was able to punch the holes in both the front and back covers at the same time.
Here's a shot of the cover after adding the eyelits and title....
Step 7: Add the rings and fill it up!
Next comes the best part... simply add in the rings and start adding pages. Because one package of Instax mini 25 cartridges includes 20 pictures, I went ahead and added 10 badge holders. This allowed me to put a picture on each side...perfect!
And here is the finished project! Love it!
I loved making this project! It was fun and easy and I was able to complete it in one 1 hour sitting. I would definitely recommend this project for someone who is looking for a fun way to house their Instax Mini photos!

Have a great day everyone!
Photobucket

Pin It

Wednesday, May 25, 2011

The good stuff...

Happy Wednesday everyone! I don't know about you, but I'm really looking forward to a long weekend! It's so nice when we get to spend some family time at home and just chillax! I'm hoping to get my scrap on this weekend, so that I can have lots of lovelies to share next week. Also, I am super excited because I just ordered this fun little gem and I should get it tomorrow....
Super excited about this! I have been wanting an Instax Mini for a while, so this will make a nice addition to my photography tools :). Also, I'm hoping to complete a project like this (click)....with the supplies that I have, so I can have a place to house all of my cool pics until they are scrapped...SO EXCITING!

For today, I'm sharing a fun layout that I made using a few Jillibean Soup papers. I also squeezed in some American Crafts Elements, A Jenni Bowlin Card and some machine sewing. I really love it when the cosmic forces come together and a layout just fits together nicely! Have a look...
Here's a close up of some of the lovelies...
I was hoping to be able to share some photos of the crazy weather from yesterday, but all of the weather happened after dark...better luck next time! Come back tomorrow where I will sharing some more scrappy goodness...Have a great day!
Photobucket

Pin It

Tuesday, May 24, 2011

Crazy Weather!!!

This weather around here has been CRAZY! And today, they are forecasting for a "significant weather event," so it sounds like we are in for quite a show...in our basement :)... Please send happy thoughts our way that it misses us :).

As for projects, I have been working on a lot of fun stuff lately. I'm hoping to get these gems into the ground soon. After a couple of years of no garden, I decided this year that I would do one. So after many hours of cleaning out the the blackberry bushes and weeds, and after a couple of months of babying my seeds into plants, I think they are finally ready to go into the garden. Now, if the weather would just cooperate, I can get those babies in! I'm REALLY looking forward to those fresh veggies later in the summer...
As for creative projects, I have been getting my hands back into the paper bucket and loving it... Here is a sneak of a project I'm working on right now... To give you some context...PJ has shown a remarkable interest in learning geography on our globe at home and since the age of 1.5 she has memorized many of the major locations around the globe.... This layout celebrates that!
Isn't that the cutest thing ever! Well, I hope that everyone stays safe in this weather - I've got my camera with me today, so I'm hoping to catch cool shots of the weather throughout the day - I will post tomorrow with the updates of today's "significant weather event :)."
Peace out!
Photobucket

Pin It

Monday, May 16, 2011

365...Everyday

Happy Monday Everyone! I'm really excited about this new kit that Jopke Van Dongen has released today. The kit is very beautiful and is comprised of several papers and elements that can be used for those everyday pages. Here's a closer look at what I've put together using the kit...


I have had these photos that I took with my IPhone for a while, just waiting to be scrapped - glad I finally ran across a kit that worked perfectly for them!

If you are interested in checking it out, you can find the digikit here: 365 Project: Pop Ups no. 1.

Have a happy Monday!
Photobucket

Pin It

Sunday, May 15, 2011

Bloom, My love...

I hope everyone had a great weekend! We had a great weekend around here - spent some fun time with some friends on Saturday and spent a low-key day at home today. We would have liked to have spent more time outside, but the weather here is unseasonably cool, but, that's Kansas for you though. I'm sure by the end of the week, it will be in the 90s :).

Today, I'm sharing a layout that I put together with a fun BG line I bought a while back. I had fun finally putting this layout together. It celebrates PJ's love for watching Sesame Street Online. She used to love watching Elmo and Inda Arie sing A,B,C together! Here's a closer look at the layout...


Bloom, My Love Credits
Patterned Paper: Basic Gray
Cardstock: Bazzill Basics, Coordinations
Embellishments: Basic Gray
Titlework: American Crafts - Dear Lizzy
Spray: Tattered Angels - Sunflower, Smooch - Mocha
Tools: Singer Sewing Machine
Thread: Coats and Clark
Stamp: Office Depot Date Stamp
Ink: American Crafts & Stampabilities


Be sure to check back tomorrow, I'll be sharing some fun layouts that I put together using Jopke Van Dongen's latest digital kit that can be used as a 365 project. Have a great start to your week everyone!

Photobucket

Pin It

Wednesday, May 11, 2011

Help! I've been sucked in!

Happy Wednesday everyone! I hope that you are having a great week! I'm having a pretty fun week so far, I'm winding down with school, getting to spend a ton of time with the little one and sharing some fun projects that I've put together recently. I've also, jumped in the black hole that we know as face book and just as I had worried, it's  very addictive! With that being said,  I would love for you guys to come and be my friend (link to me on the right sidebar)! It's been really fun reaching out to people that I haven't heard from in many years. I've also reached out to a few scrappy friends that I know too, but I'm just now really getting my feet wet. It's funny how small it really makes the world feel :). After seeing all of the people out there that I know, I'm convinced that I'm pretty much the very last person to join with a personal profile page!

Okay, on to scrappy stuff... I just love this Crate paper Restoration line - it's so much fun! Here's a closer look at my layout...
I had a lot of fun using these mini clothes line pins - not really sure how they will manage once I put them into the scrapbook, but I'm sure I will make do! I would love to hear if any of you have used them and how you've managed with them!
Big Girl Credits
Patterned Paper: Crate Paper
Titlework: October Afternoon & Basic Gray
Embellishments: Crate Paper & Misc Clothes Pins

Ribbon: American Crafts
Stamp: Technique Tuesday - Ali Edwards
Ink: Stampabilities and American Crafts
Tools: EK Success 3/4 circle punch, EK Success 1 1/2 circle punch


Thanks for stopping by today - wish me luck that I can find my way out of the black hole that I call facebook!

Photobucket

Pin It

Tuesday, May 10, 2011

It's a 2-pager Folks!

Happy Tuesday Everyone! Can you believe it - I'm blogging for the second day in a row! Watch out folks - I'm on a roll :)... I'm really excited today to be sharing this layout today. It's a 2 pager and although I do love to put these together, they can sometimes be challenging! However, a while back, I won a lovely prize from my friend Melissa Elsner and The Profound Brunette blog; (thanks friend!) - it was the 7th edition of Sketches for Scrapbooking by Allison Davis. It's a wonderful book of sketches and I love having it for a resource...I don't typically follow sketches to a "t," but I do like to use them for inspiration sometimes and especially when I'm using several photos. Here is a closer look at the layout that I made using the sketch...
Jake and I had a great time going to the Big 12 Tournament and watching KU win. But most importantly, Jake and I had a great time hanging out and spending some adult time together - I love that!
Big 12 Fun Credits
Patterned Paper: Jillibean Soup
Cardstock: Bazzil Basics, Coordinations
Titlework: American Crafts, October Afternoon, Paper Studio
Thread: Coats & Clark, Baker's Twine
Tools: Singer Sewing Machine, EK Success Curvy Cutter, EK Success Paper Punch
Fonts: Ali Edwards, Adobe Caslon, Arial Narrow


So, do you like to do two pagers, or are you mostly addicted to doing one-pagers? Would love to know what you think! Have a great day everyone!

Photobucket

Pin It

Monday, May 9, 2011

My New Favorite Stamp....

Happy Monday everyone! I hope that everyone had a great weekend! Did you celebrate Mother's Day? Did you scrapbook your heart out for NSD? I had a great weekend and did both! I am so excited to have lots of projects to share with you guys this week and next week - it's been a lot of fun getting to play with all the new goodies I ordered recently. One of my new favorite things is this stamp that I purchased from 2ps...


The stamps are so versatile and fun! And because I like to scrapbook those everyday moments, I absolutely love this new set - it's going to be hard not to use it on every page I make! So here's one of the new layouts that I had fun creating - I know I've mentioned this about a bazillion times, but I am about a year behind in scrapbooking, so when I come across pictures from a year ago like these, I get really excited and motivated to get some pages done...here's a closer look at the layout...


It's T.P. See? Credits
Patterned Paper: My Minds Eye
Titlework: Pink Paislee, Basic Gray, My Minds Eye
Ink: Stampabilities & American Crafts
Embellishments: 7 Gypsies & My Minds Eye
Tools: Sewing Machine

So, do you have any new favorite scrappy items that you love? I would love to hear about them!

Thanks for stopping by today! Hope you are having a great start to your week!

Photobucket

Pin It

Friday, May 6, 2011

Beauty Queen

Happy Friday Everyone! Is anyone else excited for the weekend? I know I am! I just turned in my final homework assignment of the semester for school last night, so I no longer have this "I need to do homework" thing hanging over my head...at least for the next couple of months :)... soooo looking forward to a break!

With that in mind, I plan on getting my "scrapbook on" this weekend to celebrate National Scrapbooking Day and Mother's Day! I'm hoping to knock out some fun projects with all of the fun goodies that I ordered from 2 Peas a couple of weeks ago. I kind of went all out... I bought the new Trendsetters line from Webster's, some Studio Calico, the Portrait collection by Crate Paper and a few odds and ends from Hambly... Yay me! Now all I need is some free time and some fun music!

To get this party started, I'm sharing a lovely new digital kit collection released yesterday by Jopke van Dongen. The kit is called Beauty Queen and I absolutely love it...here's what I made using it...

If you are interested in checking out the kit, just click on the link below and it will take you to DHD to check out all of the new stuff!

So is anybody else celebrating National Scrapbooking Day and/or Mother's Day and if so, what are you doing to celebrate?

Thanks for stopping by folks - hope you have a great Friday!
Photobucket

Pin It

Wednesday, May 4, 2011

Freebies at DHD and a Hair Cut!

Hey everyone! Some exciting news over at DHD - they are having a blog hop and giving away some great freebies. To join in the fun, I put together this layout using Jopke van Dongen's portion of the kit... Here's a closer look...
If you are interested in checking out the kit below, click on the link and you will be taken to Jopke's website where you download the kit for FREE! That's right folks... it's free.
Here's a look at all of the lovelies that are being given away at all of the different blogs... Aren't they beautiful!
On a separate note, I decided that I wanted to get my hair chopped today - it's pretty short, but a much needed change!
Thanks for stopping by! Hope you have a great rest of your day.
Photobucket

Pin It